This article contains affiliate links. We may earn a commission if you make a purchase through these links, at no additional cost to you.
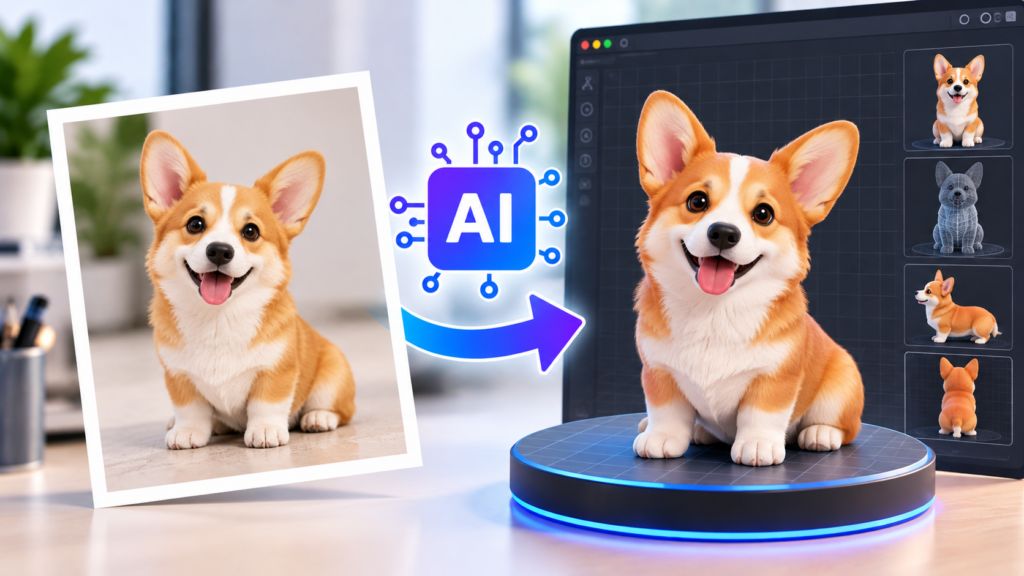
Learning how to turn a picture into a 3D model with AI is becoming easier for people who want to transform photographs, sketches, and digital illustrations into three-dimensional objects. Instead of manually recreating every shape in traditional modeling software, you can upload an image and use AI to generate a model that can be viewed from different angles.
This approach is particularly useful for game developers, digital artists, hobbyists, and people exploring 3D printing. For example, you might have a drawing of a cartoon character that you’d like to turn into a 3D figure, or a photograph of a decorative object that you want to use in a digital scene. AI can help produce an initial model without requiring you to build the entire object manually.
However, converting an image into a 3D model isn’t always straightforward. A photograph only shows part of an object’s shape, which means the AI must estimate details that aren’t visible. Understanding these limitations, choosing suitable reference images, and checking the generated model can make a significant difference in the final result.
How to Turn a Picture Into a 3D Model With AI
Image-to-3D technology uses artificial intelligence to analyze a two-dimensional image and generate a three-dimensional representation of the subject. The system identifies visual information such as outlines, proportions, colors, and surface details, then attempts to reconstruct the object’s shape.
Unlike a normal photograph, a 3D model can be rotated and examined from different viewpoints. Depending on the platform and export format, it may also be edited, textured, animated, or prepared for use in another application.
The challenge is that a single picture doesn’t contain complete information about an object. If you upload a photograph of a chair taken from the front, the AI can see the seat and front legs but may have to estimate the shape of the backrest and rear supports.
This is one reason image-to-3D conversion works better with some subjects than others. Objects with simple, recognizable shapes are generally easier to reconstruct than subjects with complicated geometry, transparent materials, or overlapping components.
The process also differs from photogrammetry, which traditionally uses multiple photographs taken from different positions to reconstruct a subject. AI image-to-3D tools may generate plausible geometry from a single image, but that doesn’t necessarily mean the resulting model accurately reproduces the original object’s dimensions.
Step-by-Step: How to Turn a Picture Into a 3D Model With AI
Most image-to-3D platforms follow a similar workflow. You select a reference image, upload it to a compatible tool, generate an initial model, inspect the result, and make adjustments before exporting it.
Although the process sounds simple, the preparation and review stages are important. A clear image can reduce reconstruction problems, while checking the model afterward helps identify details that the AI may have interpreted incorrectly.
Step 1: Choose a Clear Reference Image
Start with an image that clearly shows the object you want to convert. The subject should be easy to distinguish from its surroundings, with enough visible detail for the AI to understand its basic shape.
For example, a photograph of a ceramic vase against a plain background is usually a more manageable starting point than a photograph showing several decorative objects crowded together on a shelf. In the second example, the AI may struggle to identify where one object ends and another begins.
Lighting also matters. Strong shadows, reflections, and uneven illumination can make certain shapes difficult to interpret. A well-lit image with visible edges and consistent proportions provides a clearer reference.
For your first attempt, choose an object with a relatively simple shape, such as a mug, toy, chair, or small decorative figure. More complicated subjects can be explored once you’re familiar with the process.
Step 2: Prepare the Picture Before Uploading
Before uploading the image, take a few minutes to remove unnecessary visual distractions. Cropping the picture around the subject can help the AI focus on the object rather than the surrounding environment.
If the image contains a complicated background, consider removing it using an image-editing application. This is particularly useful when the subject has a distinctive outline that might otherwise blend into nearby objects.
You should also check whether the image is blurry, heavily compressed, or missing important details. Increasing resolution won’t necessarily recover information that was never captured, but using the clearest available original image can improve the quality of the input.
The same principles apply to other creative AI workflows. Understanding how to use AI tools effectively involves preparing useful inputs, setting clear expectations, and refining results rather than relying on a single automated attempt.
If you have multiple photographs of the same object, keep them available. Some platforms accept front, side, and back views, which can provide additional information about surfaces that aren’t visible in a single image.
Step 3: Upload the Image to an AI 3D Modeling Tool
Once your image is ready, choose a platform that supports image-to-3D generation. Not every AI image generator can produce an actual 3D model, so check that the service creates exportable 3D geometry rather than simply generating a picture with a three-dimensional appearance.
Some platforms focus on static objects, while others provide additional features such as automatic texturing, rigging, or animation. The best option depends on what you intend to do with the finished model.
For example, V2Fun is an AI 3D creation platform that describes support for image-to-3D generation, including workflows using multiple reference views. It also offers related features for textures and character animation. These capabilities may be useful for creators who want to develop their models further, although results and export options should be evaluated against the requirements of each project.
After uploading your picture, review any available settings. Depending on the platform, you may be able to choose a visual style, adjust generation preferences, or provide additional instructions.
Avoid changing too many settings during your first attempt. Starting with a straightforward conversion makes it easier to identify which parts of the process need improvement.
Step 4: Generate and Review the Initial 3D Model
After submitting the image, the AI will attempt to reconstruct the subject as a three-dimensional object. Processing time varies depending on the platform, image complexity, and available computing resources.
Once the model appears, don’t judge it only by the first preview. Rotate it and inspect the front, back, sides, and top to see whether the overall shape matches the original picture.
Imagine converting a drawing of a small robot. The front view might look accurate, with the correct face, colors, and body shape. However, the back of the robot may contain details that weren’t present in the drawing because the AI had to invent those surfaces.
This isn’t necessarily a problem if you’re creating a decorative object or experimenting with a character concept. However, it becomes more important when you need accurate proportions, consistent character design, or a model that will be viewed from several angles.
If the result looks significantly different from your reference, try using a clearer image or adjusting the available generation settings before moving on.
Step 5: Refine the Shape and Surface Details
Once the basic model looks acceptable, examine its geometry and textures more closely. Geometry determines the object’s physical shape, while textures and materials influence how its surfaces appear.
For example, an AI-generated wooden chair might have the correct overall structure but an uneven seat or poorly connected legs. Its wood texture might also look convincing from the front but appear stretched or inconsistent on other surfaces.
Some platforms include tools for modifying textures, improving mesh structure, or regenerating selected details. More complicated problems may require additional editing in traditional 3D software.
This distinction matters because a visually attractive model isn’t necessarily technically suitable for every purpose. A character intended for animation may need geometry that bends correctly, while a model intended for 3D printing must have a suitable physical structure.
Take time to fix the most noticeable problems before exporting. Small visual imperfections may be acceptable for background objects, but structural problems can create difficulties later in the workflow.
Step 6: Export the Model in the Right Format
When you’re satisfied with the model, check the available export formats. Common options include GLB, FBX, and OBJ, although the formats supported depend on the platform.
The correct choice depends on where you intend to use the model. A game engine, animation application, and 3D-printing program may have different requirements for geometry, textures, materials, and animation data.
Before downloading the file, check whether the export includes the necessary textures and other associated data. A model that looks complete in the browser may appear differently when opened in another application if some materials weren’t transferred correctly.
Finally, open the exported file in your intended software. This allows you to check its scale, orientation, geometry, and appearance before spending more time on the project.
What Types of Pictures Work Best for AI 3D Conversion?
Not every picture is equally suitable for image-to-3D generation. The clarity of the subject, its shape, and the amount of visible detail can all affect how accurately the AI reconstructs it.
Choosing the right image is often more useful than repeatedly generating models from a reference that doesn’t provide enough information.
Photographs of Everyday Objects
Photographs of recognizable objects are a practical starting point for beginners. Items such as mugs, chairs, toys, lamps, and decorative ornaments often have shapes that are relatively easy to understand.
For example, a clear photograph of a coffee mug may provide enough visual information for the AI to estimate its cylindrical body and handle. However, the exact shape of the handle’s hidden side or the thickness of the mug may still be inaccurate.
Simple backgrounds and consistent lighting can make these photographs easier to process. When possible, avoid images where the object is partly hidden behind another item.
Drawings and Character Illustrations
Character drawings can also work well, particularly when the artwork has a clear outline and consistent proportions. Cartoon characters, mascots, and stylized creatures are common subjects for image-to-3D experimentation.
The main challenge is that illustrations don’t always provide realistic information about depth. A character with exaggerated facial features or unusual anatomy may require the AI to make substantial assumptions about how those details should appear in three dimensions.
If the model will eventually be animated, consider whether the original design includes clearly defined arms, legs, and other movable parts. A visually appealing illustration doesn’t always translate into a character that’s easy to rig or animate.
Product Images and Concept Sketches
Product photographs and sketches can be useful when exploring how an idea might look as a three-dimensional object. Designers may use them to create early visualizations of furniture, accessories, electronic devices, or packaging concepts.
For instance, a sketch of a desk organizer could become a rough 3D concept that helps illustrate its compartments and overall proportions. This may be useful for brainstorming or communicating an idea before developing a more precise model.
However, AI-generated product models shouldn’t be treated as engineering drawings. Their dimensions, connections, and structural details may not match the original design, even when the visual appearance seems convincing.
Images With Multiple Views
If accuracy matters, providing several views of the same object can be more useful than relying on one photograph. Front, side, and back images reveal details that would otherwise be hidden from the AI.
For example, a front-facing image of a chair may show its seat and backrest, while a side view provides more information about the seat depth and support structure. Together, these references can reduce some of the uncertainty involved in reconstruction.
The importance of hidden geometry is also recognized in Adobe’s research on 3D reconstruction from a single image, which examines the difficulty of recovering shapes when parts of a subject are obscured.
Multiple views don’t guarantee a perfect model, but they can give the reconstruction system a more complete picture of the subject. This is especially valuable for objects that need to maintain consistent proportions from different angles.
Common Problems When Turning Pictures Into 3D Models
Converting a picture into a 3D model can produce impressive results, but the first attempt doesn’t always look the way you expect. Some models have distorted proportions, missing details, or surfaces that appear convincing from one angle but look incorrect when rotated.
These problems often happen because a two-dimensional image doesn’t contain enough information to describe an entire object. Understanding what causes them can help you decide whether to improve the reference image, adjust the generation settings, or edit the model manually.
Missing or Incorrect Details
One of the most common problems is that the AI generates details that weren’t present in the original picture. For example, a photograph of a chair might show its front and one side, leaving the AI to estimate the appearance of the back and hidden legs.
The resulting model may look reasonable but differ from the actual object. This is especially noticeable with characters, mechanical objects, and products that have distinctive shapes or small components.
If accuracy matters, use additional reference images whenever the platform supports them. A side or rear view can provide information that a single photograph cannot.
Distorted Shapes and Proportions
AI sometimes struggles to reproduce the proportions of objects with complicated geometry. A generated character might have oversized hands, uneven legs, or an incorrectly shaped head, even when the original illustration looks balanced.
These problems can also affect everyday objects. A table may have legs of different lengths, or a decorative lamp might have an uneven base.
Before generating another version, examine whether the original image clearly shows the object’s proportions. Images taken from unusual angles or with strong perspective distortion can make reconstruction more difficult.
Inconsistent Textures and Materials
A generated model may have realistic-looking materials on its front surface but stretched or inconsistent textures elsewhere. This can happen when the AI has limited information about how the material should continue around the object.
For example, a wooden cabinet might have a convincing wood pattern on its doors but an unnatural texture on the sides. Similarly, a character’s clothing may contain patterns that don’t align correctly around the body.
Some platforms allow users to regenerate or replace textures without rebuilding the entire model. For more detailed adjustments, traditional 3D editing software may provide greater control.
Models That Don’t Work in Other Applications
A model can look complete inside an AI platform but behave differently after export. Materials may be missing, objects may appear at the wrong scale, or the mesh may not meet the requirements of the destination software.
This becomes particularly important when preparing models for game development, animation, or 3D printing. Each application has its own technical requirements, and a successful export doesn’t automatically guarantee compatibility.
The simplest precaution is to test the exported file early. Opening a basic model in your intended software can help identify potential problems before you spend time developing a more complicated project.
How to Improve AI-Generated 3D Models
Getting better results from image-to-3D tools often involves improving the input rather than relying entirely on more advanced generation settings. A clearer picture, better lighting, or additional reference views can make it easier for the AI to interpret the subject.
Small changes can also make the process more predictable. Instead of repeatedly generating models without understanding what went wrong, review each result and identify the specific detail that needs improvement.
Use Images With Clear Backgrounds
Busy backgrounds can make it difficult for an AI system to distinguish the main subject from surrounding objects. A photograph of a toy on a crowded desk, for example, may contain overlapping shapes, reflections, and shadows that interfere with reconstruction.
Whenever possible, use an image with a plain or contrasting background. Cropping unnecessary surroundings can also help keep the focus on the object you want to convert.
Background removal isn’t always necessary, but it can be useful when the subject has a complicated outline or appears against similarly colored objects.
Provide Multiple Angles When Possible
A single image leaves the AI to estimate hidden surfaces, which can introduce inaccuracies. Additional views help communicate the object’s actual structure and reduce the amount of information the system must invent.
For example, if you’re converting a character illustration, a front view can establish facial features and clothing details, while side and back views can clarify the character’s proportions and overall shape.
Try to use images with consistent lighting, scale, and visual style. If the reference views show significantly different proportions or conflicting details, the AI may struggle to combine them into a coherent model.
Start With Simple Objects
Complex subjects introduce more opportunities for reconstruction errors. A detailed mechanical object with numerous moving components is generally more difficult to reproduce than a simple decorative vase or stylized toy.
For beginners, starting with recognizable objects makes it easier to evaluate whether the AI has understood the reference correctly. You can focus on shape, proportions, and textures without dealing with too many small components.
Once you’re comfortable with the workflow, gradually move toward more detailed characters, furniture, or product concepts.
Make Small Adjustments Between Attempts
If the first model doesn’t look right, avoid changing everything at once. Instead, identify the most noticeable problem and adjust the input or settings accordingly.
For example, if a generated character has the correct body shape but an inaccurate face, try using a clearer reference that shows the facial details. If the model has incorrect proportions, consider whether the original photograph was taken from an angle that distorted the subject.
Keeping track of what you change between generations can help you understand which adjustments improve the result. This is often more productive than repeatedly submitting the same image and hoping for a better outcome.
Can You Use Image-to-3D Models for Games or 3D Printing?
AI-generated 3D models can be useful for both game development and 3D printing, but the requirements are different. A model that looks good in a digital preview may still need substantial preparation before it can be used in either application.
The intended purpose should guide how you evaluate the result. Visual appearance matters, but geometry, dimensions, file compatibility, and technical performance can be just as important.
Using AI-Generated Models in Video Games
Game developers can use image-to-3D tools to experiment with characters, environmental objects, furniture, and other assets. For example, an illustration of a fantasy treasure chest could become an initial 3D object for a game environment.
However, generated assets may contain unnecessarily complex geometry or textures that aren’t optimized for real-time rendering. Characters may also need additional rigging and mesh adjustments before they can be animated properly.
It’s worth testing these assets alongside the rest of your project. Even a visually attractive model can create performance problems if its geometry or materials are unsuitable for the game engine.
The same principle applies to the wider gaming environment: visual quality and technical performance need to work together. A well-designed asset is most useful when it looks appropriate and runs efficiently within the intended game.
Preparing AI-Generated Models for 3D Printing
3D printing introduces physical requirements that don’t apply to purely digital models. The geometry must be suitable for conversion into printable layers, and the object needs appropriate dimensions and structural characteristics.
For example, a generated figurine might contain very thin arms, disconnected components, or surfaces that aren’t properly enclosed. These issues can cause problems during slicing or printing, even when the object looks complete on screen.
Before printing, inspect the model in suitable preparation software and check for geometry errors. The Prusa Knowledge Base provides practical information about preparing models, using slicing software, and troubleshooting common printing problems.
It’s also important to consider whether the model needs supports, how it should be oriented, and whether small details can be reproduced by your printer. AI can help create the initial design, but physical printing still requires careful preparation.
How to Choose the Right Image-to-3D AI Tool
Choosing an image-to-3D platform involves more than looking at impressive examples on its website. The most useful tool is one that can handle your type of reference images and export models in a format compatible with your intended project.
Start by checking whether the platform supports the input methods you need. Some tools accept only a single image, while others support multiple reference views. If you regularly work with character illustrations or product photographs, having more control over the input can be valuable.
Editing capabilities are another consideration. A service that allows you to refine textures, adjust geometry, or regenerate specific details may be more practical than one that only produces a finished model with limited modification options.
You should also check whether the platform supports the export formats required by your software. If you plan to use the results in a game engine or animation application, test the export workflow before committing to a paid plan.
Beyond export compatibility, consider how well the software handles the types of projects you create. The growing selection of AI tools for productivity and creative work offers plenty of options, but features such as editing flexibility, output quality, and ease of use are often more important than an extensive list of capabilities you may never need.
Finally, compare pricing, generation limits, and commercial usage rights. Some platforms use credit-based systems, while others offer subscription plans with different allowances. If you need to generate several versions of the same object, these limits can affect the overall cost.
Is It Better to Use AI or Traditional 3D Modeling Software?
AI and traditional 3D modeling software serve different purposes. Image-to-3D tools can help you create initial models quickly, while traditional applications provide greater control over geometry, proportions, materials, and technical details.
For beginners, AI can make the first stage more approachable. Instead of learning to construct every object manually, you can start with an existing picture and explore how it might look in three dimensions.
However, traditional software remains important when accuracy and customization matter. If you’re recreating a real product with specific measurements or preparing a character for complex animation, manual editing may still be necessary.
A practical approach is to use AI for the initial reconstruction and traditional software for refinement. This gives you a starting point without limiting your ability to correct structural problems or improve the final model.
Frequently Asked Questions
Can AI turn any picture into a 3D model?
AI can attempt to generate a 3D model from many types of pictures, including photographs, drawings, and digital illustrations. However, the results depend on the clarity and complexity of the subject. Images with overlapping objects, hidden details, or unusual perspectives may produce less accurate models.
Can I convert a drawing into a 3D character?
Yes. Many image-to-3D tools can generate initial character models from drawings or illustrations. Stylized characters with clear outlines are often suitable for experimentation, although the generated geometry may require additional work before the character can be animated.
Do I need multiple photos to create a 3D model?
Not necessarily. Some AI tools can generate a model from a single image, but the system must estimate surfaces that aren’t visible. Multiple reference views can provide more information about the subject and may improve the accuracy of the reconstruction.
Can I turn a picture into a 3D model for free?
Some AI platforms offer free plans, trials, or limited generation credits. However, free access may restrict the number of models you can create, the available export formats, or commercial usage. Check the current terms before choosing a service.
What file format should I use for an AI-generated 3D model?
The best format depends on your intended application. GLB is useful for many 3D viewing and sharing workflows, while FBX is commonly used for animation and game development. OBJ is also widely supported for static geometry. Always confirm compatibility with your destination software.
Are AI-generated 3D models accurate enough for manufacturing?
AI-generated models can be useful for concept visualization, but they shouldn’t automatically be treated as precise engineering designs. Dimensions, structural details, and material requirements must be verified before using a model for manufacturing or other precision-sensitive applications.
Can I sell 3D models created from pictures using AI?
Commercial use depends on the platform’s terms, the rights associated with the original image, and applicable laws. If you’re converting someone else’s artwork, photograph, or protected design, obtaining permission may be necessary. Review both the AI platform’s licensing terms and your rights to the source material before selling the result.
Final Thoughts
Learning how to turn a picture into a 3D model with AI can make digital creation more accessible, particularly for people who already have photographs, sketches, or illustrations they want to explore in three dimensions. The technology can provide a useful starting point for game assets, digital characters, product concepts, and creative projects without requiring every shape to be constructed manually.
However, the quality of the reference image and the way you evaluate the generated model are just as important as the AI tool itself. Clear images, multiple views, careful inspection, and appropriate editing can help reduce common problems with geometry and textures.
For beginners, the most practical approach is to start with a simple image, experiment with the conversion process, and learn how to refine the result. AI can speed up the early stages of 3D creation, while traditional modeling tools remain valuable for producing accurate, polished, and technically usable assets.
Did this solve your problem?
Your answer helps Supportia prioritize updates. No account or email is required.